Adding a REST API to the business network
This guide will show how to generate a REST api for the Digital Property business network. This api will be dynamically generated by using LoopBack from the specified Business Network Model. What is generated is not a generic api, but is specifically configured to let you interact with the assets you have specified.
To get started with using this to create a REST interface to a Business Network, follow the steps below. If you've not followed the Getting Started guide yet, it's worth following that first so you have Fabric Composer up and running on Hyperledger.
Check that the Digital Land Title Network is up and running
Let's check the assets that are in the Digital Land Title registries. From your existing getting started directory issue
$ npm run listAssets

> concerto-gettingstarted@1.0.0 listAssets /home/matthew/git17/Concerto-GettingStarted
> node cli.js landregistry list

info: [Handel] IBM Concerto: Handel appliation
info: [Handel] LandRegistry:<init> businessNetworkDefinition obtained digitalproperty-network@0.0.22-20170116133558
info: [Handel] listTitles Getting the asset registry
info: [Handel] listTitles Getting all assest from the registry.
info: [Handel] listTitles Current Land Titles
info: [Handel] Titles listed
info: [Handel]
┌──────────┬────────────────┬────────────┬─────────┬─────────────────────────────┬─────────┐
│ TitleID  │ OwnerID        │ First Name │ Surname │ Description                 │ ForSale │
├──────────┼────────────────┼────────────┼─────────┼─────────────────────────────┼─────────┤
│ LID:1148 │ PID:1234567890 │ Fred       │ Bloggs  │ A nice house in the country │ Yes     │
├──────────┼────────────────┼────────────┼─────────┼─────────────────────────────┼─────────┤
│ LID:6789 │ PID:1234567890 │ Fred       │ Bloggs  │ A small flat in the city    │ No      │
└──────────┴────────────────┴────────────┴─────────┴─────────────────────────────┴─────────┘
info: [Handel] Command completed successfully.
We can see the two sample land titles listed.
Install LoopBack
We need to install LoopBack; this is two npm modules loopback and loopback-cli.
You might need to issue both of these using sudo.
npm install -g loopback
npm install -g loopback-cli
Creating the LoopBack server application
We need to have a LoopBack server running to serve the REST api. As this is an application itself, it's worth creating a new directory for this. So assuming you're still in the Getting Started directory create a new directory as follows.
cd ..
mkdir loopback-server
cd loopback-server
You can now create the loop back server. Issue the command lb in this new directory. This is the output you'll see together with the answers to the questions you'll be asked.
$ lb

     _-----_
    |       |    ╭──────────────────────────╮
    |--(o)--|    │  Let's create a LoopBack │
   `---------´   │       application!       │
    ( _´U`_ )    ╰──────────────────────────╯
    /___A___\   /
     |  ~  |
   __'.___.'__
 ´   `  |° ´ Y `

? What's the name of your application? rest
? Which version of LoopBack would you like to use? 2.x (long term support)
? What kind of application do you have in mind? api-server (A LoopBack API server with local User auth)
Generating .yo-rc.json


I'm all done. Running npm install for you to install the required dependencies. If this fails, try running the command yourself.


   create .editorconfig
   create .eslintignore
   create .eslintrc
   create server/boot/root.js
   create server/middleware.development.json
   create server/middleware.json
   create server/server.js
   create README.md
   create server/boot/authentication.js
   create .gitignore
   create client/README.md
That is now all created - the next step is to add an adapter to link with the Fabric Composer runtime.
npm install --save composer-loopback-connector
Last step before trying things out is to add a function in the server/boot boot directory. This function is below - the key parts are in the datasource variable. These have been filled out with the same settings of the Getting Started guide.
Create a new file in this directory with the following contents, the name of the file is not important, so for example loopback-composer.js.
'use strict';

module.exports = function (server) {

  const dataSource = server.loopback.createDataSource('Concerto', {
    "name": "Concerto",
    "connector": "composer-loopback-connector",
    "connectionProfileName" : 'defaultProfile',
    "businessNetworkIdentifier" : 'digitalproperty-network',
    "participantId" : 'WebAppAdmin',
    "participantPwd" : 'DJY27pEnl16d'
  });

  dataSource.discoverModelDefinitions({}, (error, modelDefinitions) => {
    console.log('Concerto Loopback Connector');

    if (error) {
      throw error;
    }
    modelDefinitions.forEach((modelDefinition) => {
      console.log('found modelDefinition = ' + JSON.stringify(modelDefinition))
      dataSource.discoverSchemas(modelDefinition.name, {visited: {}, associations: true}, (error, modelSchema) => {
        if (error) {
          throw error;
        }
        // this is required because LoopBack doesn't like dots in model schema names
        modelSchema.name = modelSchema.plural.replace(/\./g, '_');
        modelSchema.idInjection = false;
        let model = server.loopback.createModel(modelSchema);
        server.model(model, {
          dataSource: dataSource,
          public: true
        });
      });
    });
  });
};
Run LoopBack server
Go back to the loopback-server directory and start the server as follows.
$cd ../..
$ node .
WARNING: No configurations found in configuration directory:/home/matthew/git17/rest/config
WARNING: To disable this warning set SUPPRESS_NO_CONFIG_WARNING in the environment.
Web server listening at: http://0.0.0.0:3000
Browse your REST API at http://0.0.0.0:3000/explorer
Concerto Loopback Connector
found modelDefinition = {"type":"table","name":"net.biz.digitalPropertyNetwork.LandTitle"}
found modelDefinition = {"type":"table","name":"net.biz.digitalPropertyNetwork.SalesAgreement"}
found modelDefinition = {"type":"table","name":"net.biz.digitalPropertyNetwork.Person"}
Looking at the generated APIs
Launch your browser and go to the URL given (http://0.0.0.0:3000/explorer). You'll see a screen similar to this.
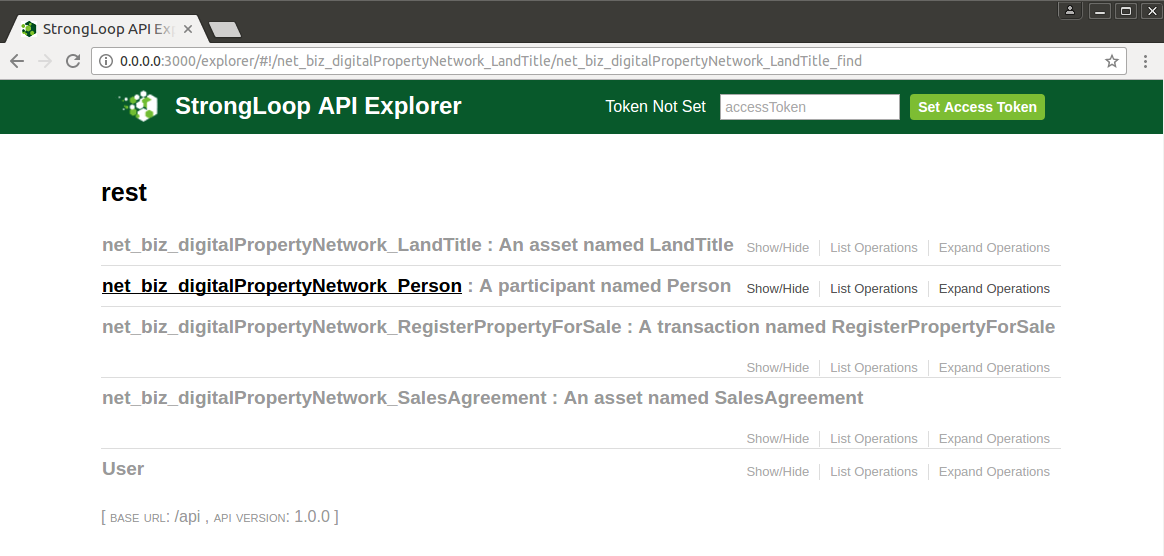
Select the Land Title asset, and you can see all the REST APIs that have generated for this asset. At present get and put are fully implemented, with transactions - so lets try and get a list of all the land titles.;
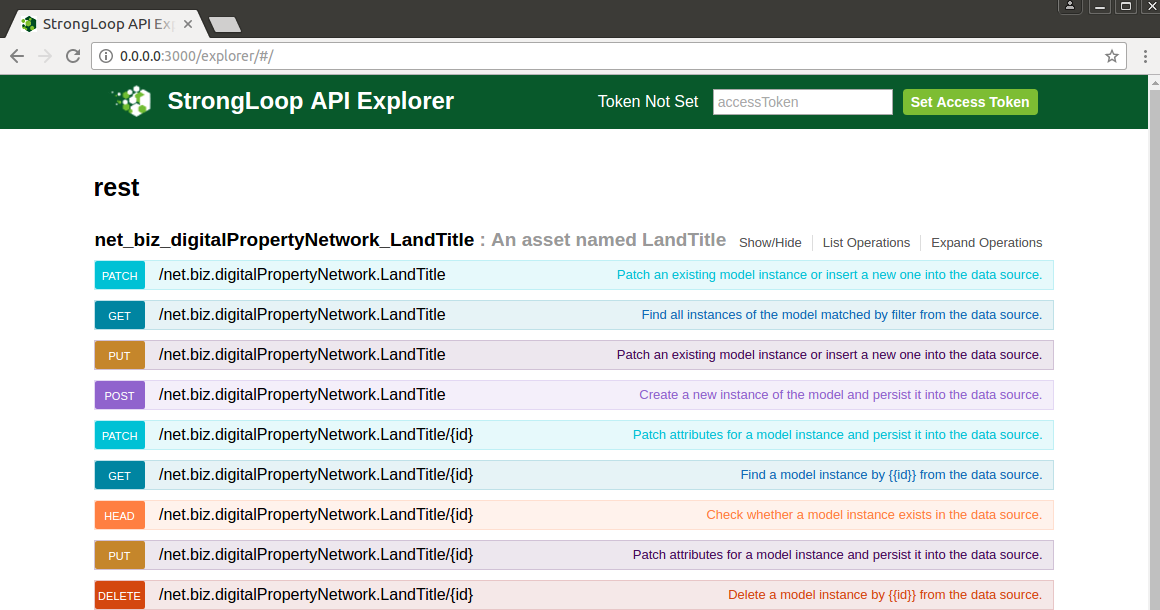
Expand the get and click on Try it Out to try it out.
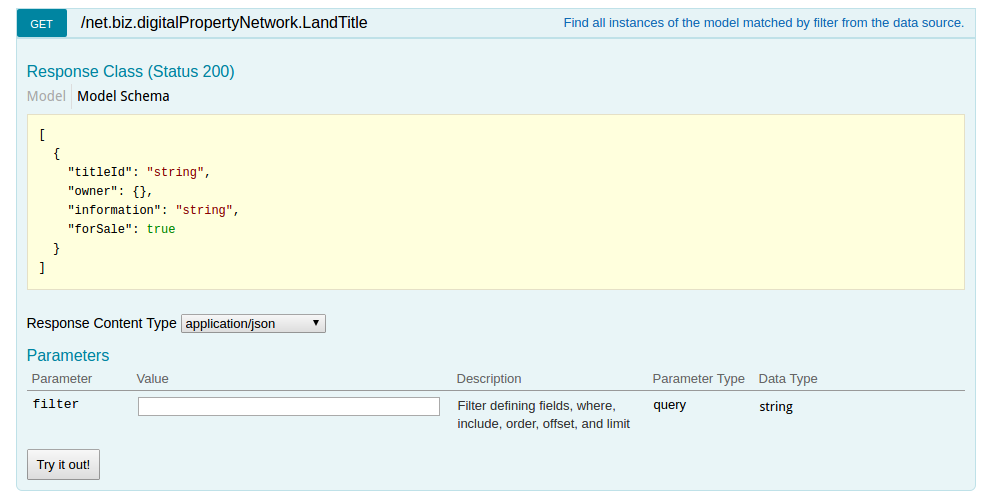
You'll see a list of land titles presented as a set of JSON
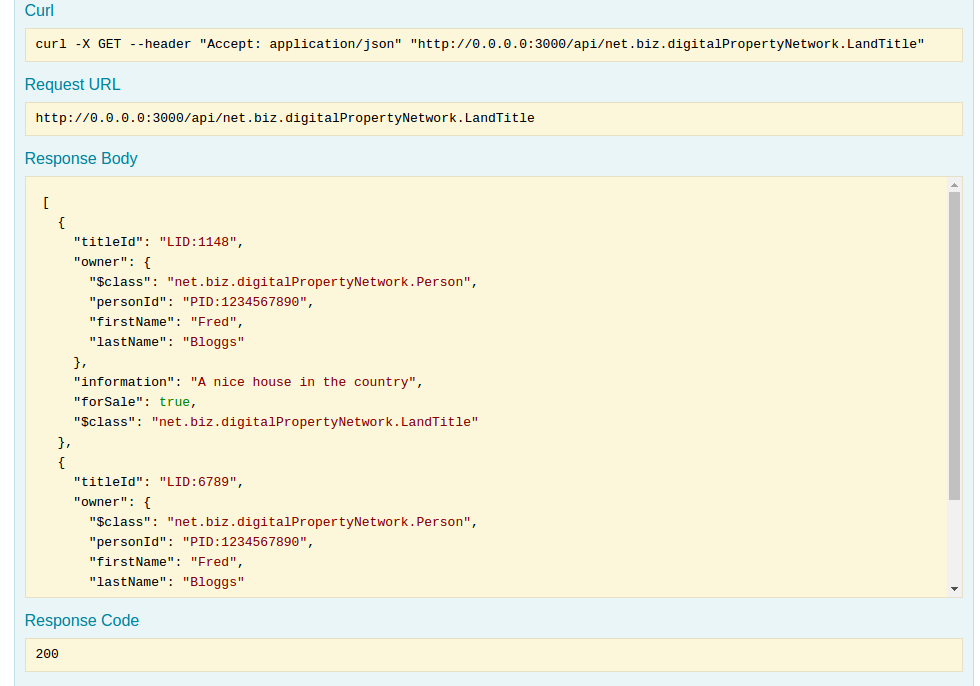
Similarly it's quite easy to issue the curl command from a terminal prompt. This can be copied from the LoopBack web page.
$ curl -X GET --header "Accept: application/json" "http://0.0.0.0:3000/api/net.biz.digitalProperTitle" | prettyjson
  % Total    % Received % Xferd  Average Speed   Time    Time     Time  Current
                                 Dload  Upload   Total   Spent    Left  Speed
100   518  100   518    0     0    549      0 --:--:-- --:--:-- --:--:--   548
-
  titleId:     LID:1148
  owner:
    $class:    net.biz.digitalPropertyNetwork.Person
    personId:  PID:1234567890
    firstName: Fred
    lastName:  Bloggs
  information: A nice house in the country
  forSale:     true
  $class:      net.biz.digitalPropertyNetwork.LandTitle
-
  titleId:     LID:6789
  owner:
    $class:    net.biz.digitalPropertyNetwork.Person
    personId:  PID:1234567890
    firstName: Fred
    lastName:  Bloggs
  information: A small flat in the city
  forSale:     true
  $class:      net.biz.digitalPropertyNetwork.LandTitle
Submitting a transaction via REST
If you go back to the main page and search down to the register property for sale, we can mark the other property for sale. In this example, we've specified the other landtitle in the data box, we've also had to specify the transaction id and the timestamp (the last two will change shortly).
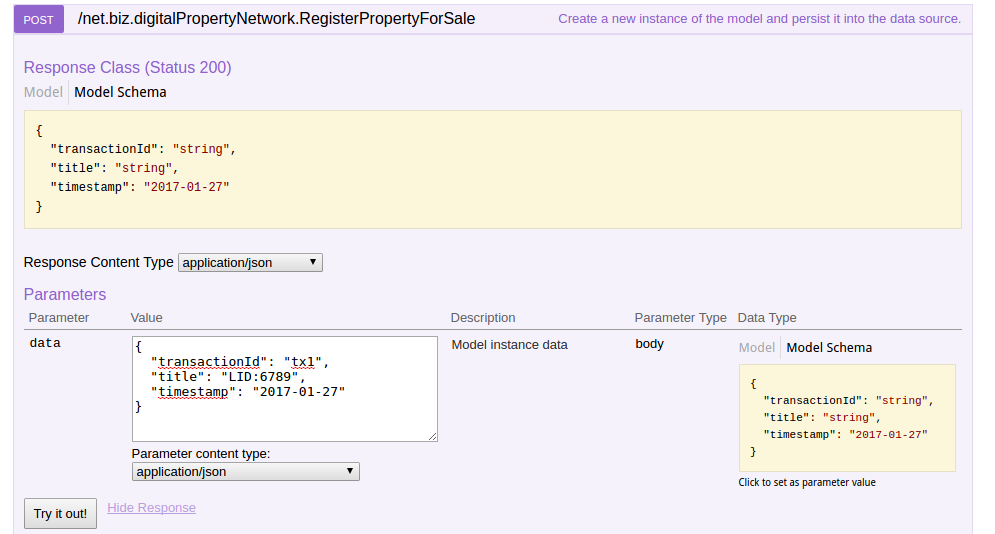
Click on the Try it out! button to submit the transaction. You'll see a succesful return code, but if you now return to your terminal prompt in the Getting Started directory, you can run the list assets command again.
You'll see now that the other land title has been marked for sale.
$ npm run listAssets

> concerto-gettingstarted@1.0.0 listAssets /home/matthew/git17/Concerto-GettingStarted
> node cli.js landregistry list

info: [Handel] IBM Concerto: Handel appliation
info: [Handel] LandRegistry:<init> businessNetworkDefinition obtained digitalproperty-network@0.0.22-20170116133558
info: [Handel] listTitles Getting the asset registry
info: [Handel] listTitles Getting all assest from the registry.
info: [Handel] listTitles Current Land Titles
info: [Handel] Titles listed
info: [Handel]
┌──────────┬────────────────┬────────────┬─────────┬─────────────────────────────┬─────────┐
│ TitleID  │ OwnerID        │ First Name │ Surname │ Description                 │ ForSale │
├──────────┼────────────────┼────────────┼─────────┼─────────────────────────────┼─────────┤
│ LID:1148 │ PID:1234567890 │ Fred       │ Bloggs  │ A nice house in the country │ Yes     │
├──────────┼────────────────┼────────────┼─────────┼─────────────────────────────┼─────────┤
│ LID:6789 │ PID:1234567890 │ Fred       │ Bloggs  │ A small flat in the city    │ Yes     │
└──────────┴────────────────┴────────────┴─────────┴─────────────────────────────┴─────────┘
info: [Handel] Command completed successfully.
Summary
Using the Loopback framework on top of the Fabric Composer runtime has allowed us to generate a business domain specific REST api based on the deployed business network model!